RasPi does the Home Automation (Part II): Crossing the bridge to JavaFX
Hi,
before JavaFX can take over, I need some bottom-up stuff to control my Intertechno-Devices.
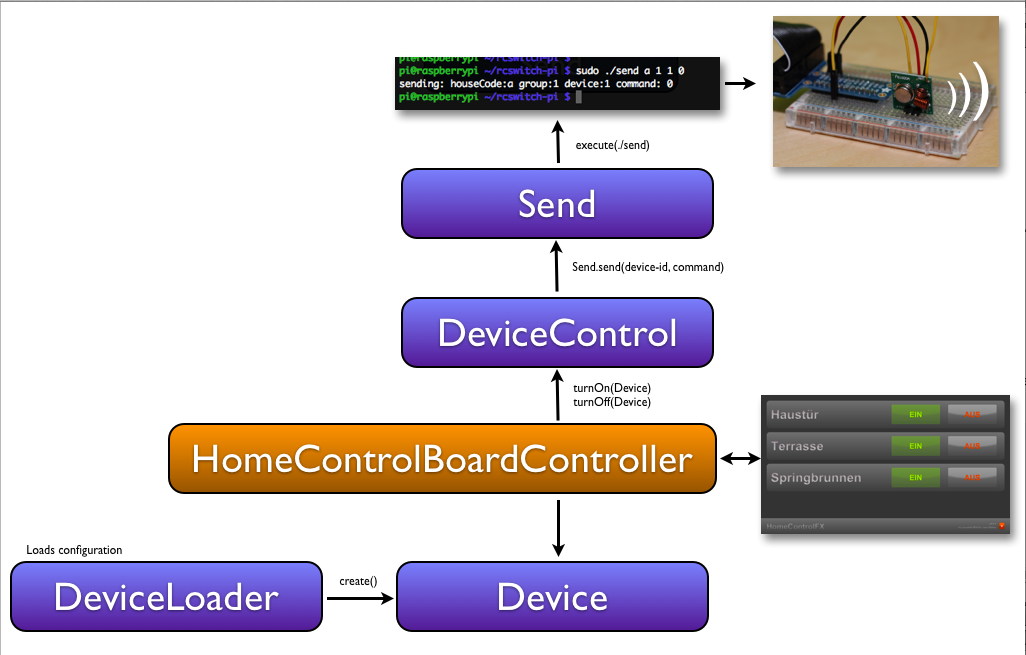
Basically this is the schema:
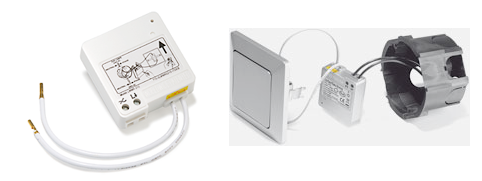
Right now I have 2 radio intermediate adapters to switch the lights of my terrace/garden and the fountain. And one of these to control the lights in front of my house (cool: can be combined with existing light switch) :
Some Details:
Pragmatic approach: “Runtime.getRuntime().exec(...)“
Clearly to pipe the data to the C implementation via a JNI call would be nice, but to get ahead in time by now for me it’s ok to use Runtime.getRuntime().exec(...) to run my “send” CLI command:
 public class Send {

  public enum Command {
    TURN_OFF, TURN_ON;
  }

  public static final String SEND_COMMAND = "/home/pi/rcswitch-pi/send";
  private static final Logger logger = Logger.getLogger(Send.class.getName());

  public void send(String deviveCode, Command command) {
    try {
      String commandLine = String.
              format("%s %s %s", SEND_COMMAND, deviveCode, command.ordinal());
      logger.log(Level.INFO, "send: {0}", commandLine);

      Runtime rt = Runtime.getRuntime();
      Process pr = rt.exec(commandLine);
      BufferedReader rd = new BufferedReader(new InputStreamReader(pr.
              getInputStream()));
      String line;
      while ((line = rd.readLine()) != null) {
        logger.log(Level.INFO, line);
      }

    } catch (IOException ex) {
      Logger.getLogger(Send.class.getName()).
              log(Level.SEVERE, null, ex);
    }
  }

  public boolean isSendCommandExecutable(){
      return Files.isExecutable(Paths.get(SEND_COMMAND));
  }
}
The Java-Send is used by DeviceControl:
public class DeviceControl {

    private Send send = new Send();
    private static final Logger logger = Logger.getLogger(DeviceLoader.class.getName());
    private static DeviceControl me;

    private DeviceControl() {
    }

    public static DeviceControl get() {
        if (me == null) {
            me = new DeviceControl();
        }
        return me;
    }

    public void turnOn(Device device) {
        logger.log(Level.INFO, "About to {0} {1} ({2})", new Object[]{Send.Command.TURN_ON, device.getName(), device.getId()});
        if (send.isSendCommandExecutable()) {
            send.send(device.getId(), Send.Command.TURN_ON);
        } else {
            logger.log(Level.SEVERE, "{0} could not be executed!", Send.SEND_COMMAND);
        }
    }

    public void turnOff(Device device) {
        logger.log(Level.INFO, "About to {0} {1} ({2})", new Object[]{Send.Command.TURN_OFF, device.getName(), device.getId()});
        if (send.isSendCommandExecutable()) {
            send.send(device.getId(), Send.Command.TURN_OFF);
        } else {
            logger.log(Level.SEVERE, "{0} could not be executed!", Send.SEND_COMMAND);
        }
    }
}
A Intertechno-appliance is represented by Device:
public class Device {

  private String name;
  private String houseCode;
  private String group;
  private String device;

  public Device() {
  }

  public Device(String name, String houseCode, String group, String device) {
    this.name = name;
    this.houseCode = houseCode;
    this.group = group;
    this.device = device;
  }

  public String getId() {
    return String.format("%s %s %s", houseCode, group, device);
  }

 [.... getter & setter ....]

}
The available Devices are defined via a configuration-file:
<?xml version="1.0" encoding="UTF-8"?>
<home-configuration>
    <devices>
        <device name="Haustür" houseCode="a" group="1" device="1"/>
        <device name="Terrasse" houseCode="a" group="1" device="2"/>
        <device name="Springbrunnen" houseCode="a" group="1" device="3"/>
    </devices>
</home-configuration>
Finally utility class DeviceLoader.load(); loads the configuration and provides a List of Devices.
The HomeControlBoardController dynamically creates DevicePanes according to the configured devices.
That’s it for now.
Next:
RasPi does the Home Automation (Part III): ‘Let’s Put It All Together’
2 thoughts on “RasPi does the Home Automation (Part II): Crossing the bridge to JavaFX”